

Introduction
When you walk into a beautifully finished room, baseboards might not be the first thing you notice. But take them away, and suddenly the space looks incomplete. That gap where your walls meet the floor? It’s more important than most people realize.
Baseboard trim serves a practical purpose (protecting your walls from scuffs and kicks) while giving your rooms a polished, finished look. Whether you’re building a new home, renovating an older property, or just trying to elevate your interior design, understanding baseboards can save you money and help you make choices you’ll love for years to come.
This guide covers everything from choosing the right baseboard trim styles for your home to understanding material options, installation costs, and design trends. We’ll walk through what makes baseboards work in Florida’s climate, how to coordinate them with your door trim, and practical tips for both residential and commercial projects.
What Is Baseboard Trim and Why Does It Matter?
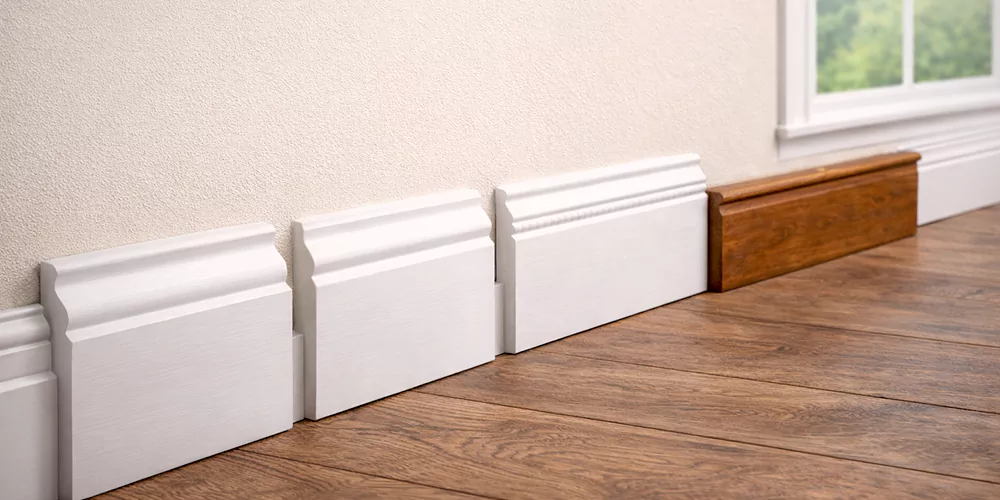
Baseboard trim (also called floor molding or wall base) is the decorative board that runs along the bottom of your interior walls. Think of it as the frame that finishes off your room where vertical walls transition to horizontal floors.
The practical side: Baseboards protect your drywall from vacuum cleaners, furniture bumps, mop splashes, and everyday wear. They also hide the gap between your wall and flooring, which naturally exists because walls and floors settle at different rates. In Florida homes especially, where humidity causes materials to expand and contract, this gap becomes even more necessary.
The aesthetic side: Good baseboard trim creates visual weight at the bottom of your walls, making rooms feel grounded and complete. The right style can make ceilings appear higher, rooms feel larger, and architectural details more cohesive. It’s one of those finishing touches that quietly elevates your entire space.
Most people think of baseboards as purely decorative, but they actually solve several real problems. When you paint walls, the baseboard creates a natural stopping point and protects the bottom edge from paint drips. When you install new flooring, baseboard covers the expansion gap required by most flooring types. And when you’re dealing with Florida’s humidity and the resulting wall movement, baseboards hide minor cracks and settling that would otherwise be visible.
The relationship between baseboards and door trim matters more than you might think. Your baseboard should coordinate with your door molding in terms of style, height, and material to create visual continuity. When these elements work together, your whole space feels more intentional and professionally finished.
Types of Baseboard Trim Styles
Colonial baseboard trim features a classic stepped profile with clean lines and subtle curves. This style works beautifully in traditional homes, Cape Cod designs, and anywhere you want timeless elegance. The profile typically includes a rounded top edge, a flat center section, and a slightly curved base. You'll often see colonial baseboards in heights ranging from 3 to 5 inches.
Traditional baseboard styles include ranch and craftsman profiles. Ranch baseboard trim tends to be simpler with minimal detail, usually just a flat board with a small curved top. Craftsman baseboard trim ideas often incorporate a flat, wide board topped with a small cap molding, reflecting the Arts and Crafts movement's preference for simple, honest materials.
These traditional profiles work well in most Florida homes because they're versatile enough to complement a range of flooring types and wall colors. They also tend to be more forgiving when walls aren't perfectly straight (which is common in older homes).
Modern baseboard trim strips away ornate details in favor of clean, geometric lines. You might see flat boards with square edges, very subtle bevels, or simple rectangular profiles. Contemporary baseboard trim follows similar principles but might incorporate one or two clean lines for visual interest without getting fussy.
The modern aesthetic typically calls for taller, simpler baseboards. A 5 to 7-inch flat board with a square edge creates a bold, contemporary statement. Some designers even use 8-inch baseboard trim or taller to make rooms feel more substantial and dramatic.
Black baseboard trim and black baseboards and trim have become increasingly popular in modern interiors. The high contrast against white or light walls creates a striking visual definition. This works especially well in open floor plans where you want to define different areas without physical barriers.
Modern profiles tend to show imperfections more readily than traditional styles, so they work best in newer construction or thoroughly renovated spaces where walls are straight and true. In Central Florida's humid climate, choosing the right material is especially important for modern designs, as any warping or separation will be more noticeable.
Some situations call for specific baseboard solutions. Baseboard trim on rounded corners requires either flexible baseboard trim materials or specialized cutting techniques. You can use baseboard trim for rounded corners made from rubber or flexible materials that bend to follow curves, or you can piece together standard baseboard with carefully cut miters.
Baseboard trim on stairs (or baseboard trim on steps) presents another common challenge. Stairway baseboard trim needs to follow the angle of your stringer while meeting up with the level baseboard on your landing. This usually involves cutting a return piece that transitions from the angled run to the level section.
Thick baseboard trim (typically 5/8 inch or thicker) creates more substantial shadow lines and feels more substantial underfoot. It also stands up better to impacts in high-traffic areas, such as commercial buildings or busy family homes.
Baseboard Trim Materials: Choosing What Works for Florida

Wood baseboard trim remains the gold standard for many homeowners and builders. Common options include pine, poplar, oak, maple, and MDF (medium-density fiberboard) with a wood veneer.
Pine baseboard: The most economical solid wood option. Pine takes paint beautifully, but it's soft enough to dent relatively easily. In Florida's humid climate, pine can be somewhat prone to warping if not properly primed and painted on all surfaces.
Poplar baseboard: Slightly harder than pine and more stable. It's a great choice if you plan to paint. Poplar resists warping better than pine and holds up well in Florida's climate when properly finished.
Oak baseboard: If you want a natural wood look with stain rather than paint, oak's prominent grain looks beautiful. White oak baseboard trim has become trendy in modern farmhouse and contemporary interiors. Oak is dimensionally stable and durable, though more expensive than pine or poplar.
MDF baseboard: Made from compressed wood fibers, MDF comes pre-primed and machines cleanly without splintering. It's very stable dimensionally and takes paint extremely well. The downside is that MDF can swell when wet, making proper painting and sealing critical in humid climates. For Florida applications, make sure the MDF baseboard is properly sealed before installation.
PVC baseboard trim (vinyl baseboard trim) offers excellent moisture resistance, making it ideal for Florida's humidity. It won't rot, warp, or harbor mold. PVC works particularly well in bathrooms, laundry rooms, and other areas where moisture is a concern. The material is available in various profiles mimicking traditional wood designs.
PVC advantages: Completely waterproof, won't rot or warp, easy to clean, lightweight, and no painting required if you choose a finished color. Many manufacturers offer PVC in white or various woodgrain finishes.
PVC considerations: It can look somewhat plastic compared to real wood, doesn't accept stain, and some profiles feel less substantial than wood equivalents. In direct sunlight near large Florida windows, some PVC products can discolor over time.
Rubber baseboard trim and flexible baseboard trim serve specific applications. These materials work well for curves, rounded walls, or areas where traditional rigid materials would crack. They're common in commercial settings but less typical in high-end residential work.
Foam baseboard trim offers another lightweight, moisture-resistant option. It's easy to cut and install, though it doesn't have the same substantial feel as wood or composite materials.
Waterproof baseboard trim options have expanded significantly in recent years. Beyond PVC, you'll find composite materials designed specifically for wet areas. These typically combine wood fibers with polymers to create a material that resists moisture while maintaining a wood-like appearance.
Metal baseboard options exist for commercial and industrial applications, though they're uncommon in residential settings. In Florida, metal baseboards would primarily appear in commercial buildings or specialized applications where extreme durability is required.
The material you choose should align with your room's use, your budget, and Florida's climate considerations. For most Central Florida homes, properly sealed poplar or MDF works well for painted finishes, while oak or hardwood makes sense if you want a natural stained look. For high-moisture areas or commercial applications, PVC or composite materials offer better long-term performance.
Choosing Baseboard Trim for Your Space

The right baseboard height depends on your ceiling height, room size, and overall aesthetic goals. Here's a general framework:
Standard ceiling height (8-9 feet): 3- to 5-inch baseboards work well. This creates proper visual proportion without overwhelming the space. In smaller rooms, stick toward the 3-4 inch range. Larger rooms can comfortably accommodate 5-6 inches.
Tall ceilings (10+ feet): You can go taller with your baseboards, anywhere from 5 to 8 inches or even more. The extra wall height allows (and often demands) more substantial trim to keep proportions balanced. A 3-inch baseboard under a 12-foot ceiling looks skimpy and unfinished.
Historic proportions: Older homes often featured very tall baseboards (8-12 inches or more) as a sign of quality construction. If you're restoring a historic property, matching the original baseboard height maintains architectural integrity.
Some designers follow the "rule of thirds," where your baseboard height should be roughly one-third the height of your door trim. This creates visual harmony between the two trim elements. So if your door trim and baseboards are 5 inches wide, a 3-4 inch baseboard would be proportionally pleasing.
Should door trim match baseboard? The short answer is that they should complement each other without necessarily being identical. Your baseboard and door trim should use similar profile styles (both traditional or modern, etc.) and materials, but their heights can differ.
Many designers make the door casing slightly wider or more detailed than the baseboard. This draws attention to doorways as architectural features while the baseboard recedes into a supporting role. The relationship between the baseboard trim and door trim matters most where they meet. Using plinth blocks (small decorative blocks) at these intersections can help transition between different trim dimensions.
When baseboard meets door trim, you have three common approaches:
- Butt joint: The baseboard simply butts into the door casing with a square cut. Simple and works well with modern profiles.
- Mitered return: The baseboard wraps around itself with a small mitered return where it meets the casing. This looks more finished and refined.
- Plinth block: A thicker, wider decorative block sits at the base of the door casing, and the baseboard butts into it. This traditional approach creates visual weight and solves the problem of different trim dimensions meeting.
Your choice depends on your overall style and whether your door trim molding design leans traditional or contemporary.
Farmhouse and coastal styles: Simple, clean profiles work best. Think flat boards with minimal detail or traditional ranch profiles. White or light painted finishes keep things bright and casual. For modern farmhouse looks, you might use thicker baseboards (1x6 or 1x8) for a more substantial feel.
Traditional and colonial homes: Opt for classic colonial profiles with subtle curves and steps. Paint-grade poplar or MDF in white or cream colors maintains the timeless aesthetic. Heights typically range from 4 to 6 inches, depending on the ceiling height.
Contemporary and modern: Clean geometric profiles, often taller (6-8 inches or more) and simpler. Consider flat boards with square edges or very minimal bevels. Black, gray, or natural wood finishes work well. The emphasis is on strong horizontal lines rather than ornate details.
Craftsman style: Wide, flat boards (often 1x6 baseboard trim or similar) topped with a separate cap molding. Natural wood stains or painted finishes both work, depending on your specific design direction.
The traditional approach uses white or off-white baseboards regardless of wall color. This creates clean visual breaks and makes the trim "disappear" in a sense. It's safe, classic, and works in almost any situation.
Contemporary design has opened up more options. Grey baseboard trim creates a softer contrast than stark white while still providing definition. It works particularly well with gray, blue, or other cool-toned wall colors.
Black baseboards and trim create dramatic contrast and work beautifully in modern interiors. The strong visual line grounds the space and defines the relationship between walls and floors. This works especially well with light wall colors and is a strong trend in contemporary design.
Natural wood finishes showcase the beauty of wood grain, particularly with species like oak or maple. This approach works best with stain-grade wood rather than paint-grade materials. Keep in mind that stained baseboards show dirt more readily than painted ones.
One consideration for Florida homes: darker finishes tend to show dust more readily on hard-surface flooring, while lighter finishes are more forgiving. Given the dust that naturally accumulates in our climate, white or light gray often proves more practical for long-term maintenance.
How to Install Baseboard Trim

Installing baseboard trim falls into the "intermediate DIY" category. If you're comfortable with a miter saw, have some experience with trim carpentry, and can measure and cut accurately, you can tackle this project yourself. That said, professional installation usually produces cleaner results with tighter joints and better-looking corners.
DIY advantages: Lower cost (you're only paying for materials), flexibility to work on your schedule, and the satisfaction of completing the project yourself. Basic baseboard installation in a small room might take a weekend.
Professional advantages: Faster completion, cleaner results (especially on corners and complex cuts), proper tools and experience, and a warranty on workmanship. Professionals can typically complete in hours what might take you days.
The decision often comes down to how many rooms you're doing and how visible the baseboard will be. A powder room or utility space makes a good DIY test project. High-traffic living areas or open-concept spaces where trim is prominently visible might warrant professional installation.
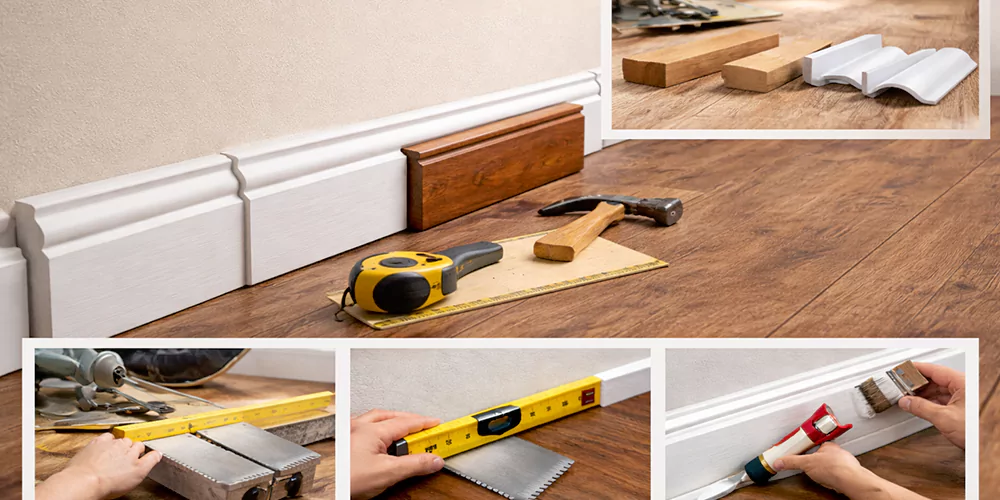
Preparation: Remove old baseboard if present. Clean the wall surface and ensure it's flat. Locate wall studs (you'll nail into these for the most secure installation). Cut baseboard pieces to length using a miter saw.
Inside corners: Most installers use "coped joints" rather than simple miters. Coping involves cutting the profile of one piece to fit against the face of another. This creates tighter joints that hold up better over time as materials expand and contract.
Outside corners: Cut 45-degree miters on both pieces so they meet at a crisp corner. Getting these perfect requires precise measurement and cutting. Even small gaps become very noticeable on outside corners.
Fastening: Use a finish nailer (pneumatic or cordless) to attach baseboard. Nail into wall studs whenever possible. For additional hold, you can also use construction adhesive along the back of the baseboard.
Finishing: Fill nail holes with wood filler or caulk (depending on material). Caulk the top edge where baseboard meets wall and the bottom edge where it meets floor (if there are gaps). Paint or finish as needed.
Farmhouse and coastal styles: Simple, clean profiles work best. Think flat boards with minimal detail or traditional ranch profiles. White or light painted finishes keep things bright and casual. For modern farmhouse looks, you might use thicker baseboards (1x6 or 1x8) for a more substantial feel.
Traditional and colonial homes: Opt for classic colonial profiles with subtle curves and steps. Paint-grade poplar or MDF in white or cream colors maintains the timeless aesthetic. Heights typically range from 4 to 6 inches, depending on the ceiling height.
Contemporary and modern: Clean geometric profiles, often taller (6-8 inches or more) and simpler. Consider flat boards with square edges or very minimal bevels. Black, gray, or natural wood finishes work well. The emphasis is on strong horizontal lines rather than ornate details.
Craftsman style: Wide, flat boards (often 1x6 baseboard trim or similar) topped with a separate cap molding. Natural wood stains or painted finishes both work, depending on your specific design direction.
Essential tools include a miter saw (for cutting angles), finish nailer, measuring tape, pencil, level, and stud finder. A coping saw helps with inside corners if you're going that route. For finishing, you'll need caulk, wood filler, sandpaper, and paint or stain.
Safety equipment matters: eye protection when cutting, hearing protection when using power tools, and a dust mask for sanding. Proper ventilation if you're painting or staining.
Uneven walls: Most walls have some waviness. Flexible caulk along the top edge of your baseboard hides small gaps. For significant waves, you may need to scribe the baseboard (cut it to follow the wall contour) or use construction adhesive to pull the baseboard tight.
Cutting baseboard trim: Accurate cuts matter most at corners. Measure twice, cut once. For outside corners, slightly overcut your angles (make them a bit sharper than 45 degrees) so the front edges meet tightly even if the back edges gap slightly.
Rounded corners: For baseboard trim on rounded corners, you have options. Flexible baseboard materials can bend to follow curves. For rigid materials, you can either piece together many small sections or use corner blocks to create a transition.
Stairs: Baseboard trim on steps follows the stringer angle. Measure the angle carefully and transfer it to your miter saw. The transition where stair baseboard meets landing baseboard usually requires a carefully cut return piece.
Cost to Install Baseboard Trim

Material costs vary significantly based on what you choose:
Pine baseboard: $0.50-$1.50 per linear foot for basic profiles. More detailed colonial profiles run $1-$2 per linear foot.
Poplar baseboard: $1-$2.50 per linear foot, depending on width and profile complexity.
MDF baseboard: $0.75-$1.75 per linear foot. Pre-primed MDF often costs slightly more but saves time on painting.
Oak or hardwood baseboard: $2-$5+ per linear foot. Premium hardwoods like white oak can exceed this range.
PVC baseboard trim: $1-$3 per linear foot. More detailed profiles cost more, and pre-finished color options add to the price.
Professional installation typically runs $2-$6 per linear foot for labor, depending on complexity. Factors affecting labor costs include:
- Number of corners (inside and outside corners take more time)
- Ceiling height (tall rooms require scaffolding or ladders)
- Wall condition (very uneven walls slow installation)
- Existing baseboard removal (adds time and disposal costs)
- Detailed profiles (more complex trim takes longer to cut and fit)
- Paint or stain requirements (adds finishing time)
For a typical 12x14 room (roughly 52 linear feet of baseboard), you might pay $100-$300 for basic installation labor, not including materials or finishing. Complex trim in larger rooms with many corners could run significantly more.
Some contractors include painting in their trim installation pricing, while others charge separately for finishing work. Always clarify what's included in quoted prices. Labor cost to paint baseboard trim typically adds $1-$2 per linear foot if done separately from installation.
For a complete baseboard replacement project in a typical room:
Budget approach (basic pine or MDF, DIY-friendly profile, contractor-installed and painted): $250-$500 for an average-sized room.
Mid-range approach (poplar or better MDF, more detailed profile, professional installation and finishing): $500-$900 for an average-sized room.
Premium approach (hardwood, detailed profile, professional installation with stain or custom paint finish): $900-$1,500+ for an average-sized room.
These estimates include materials, labor, and finishing. Costs multiply quickly with whole-house projects, but you often get a labor discount when doing multiple rooms at once.
Design Ideas and Current Trends

The contemporary trend leans toward simpler, taller baseboards. A flat 1x6 board or even a 1x8 board with square edges creates clean lines that complement modern interiors. Some designers add a thin cap molding on top for subtle detail without getting ornate.
Mid-century modern baseboard trim keeps things minimal. Often just a flat board, 3-5 inches tall, with no additional molding. The goal is clean lines that don't compete with furniture and architectural features.
Color plays a bigger role in modern designs. Instead of defaulting to white, consider how your baseboard color relates to your floor and wall colors. Matching your baseboard to your floor color can make the floor appear to extend further, while matching wall color makes baseboards recede visually.
Not every project needs custom millwork and complex profiles. Simple baseboard trim ideas work beautifully in many applications:
- Flat 1x4 or 1x6 boards in white or off-white for a clean, Scandinavian-inspired look
- Basic ranch profile for traditional spaces that don't need ornate details
- Single-piece installation (no separate shoe molding) for faster installation
- Pre-finished PVC in standard white to eliminate painting time
- Self-adhesive baseboard trim or stick-on baseboard trim for renters or very light-duty applications (though these typically don't look as refined as properly installed solid baseboard)
Your flooring choice affects baseboard decisions. With hardwood or luxury vinyl plank, you can either match your baseboard to the floor color (creating visual continuity) or contrast it sharply (defining the transition clearly).
Tile floors often look best with baseboard that contrasts rather than matches. White baseboard against colored tile creates clean definition. Some designers use the same tile as a 4-6-inch "baseboard" for a fully tiled look, though this works better in bathrooms than in living spaces.
Carpet installation affects baseboard height. You'll want at least 4 inches of baseboard to ensure adequate coverage after carpet is installed, as carpet can compress slightly and vary in thickness.
Quarter round, or shoe molding, sits at the base of your baseboard, covering the gap between the baseboard and the floor. Not all installations need it. If your baseboard sits tight to the floor with no gaps, you can skip shoe molding for a cleaner look. But in older homes or on uneven floors, shoe molding effectively hides irregularities.
Commercial spaces often prioritize durability over aesthetic refinement. Rubber baseboard or vinyl wall base is common in offices, schools, and healthcare facilities because it's virtually indestructible and easy to clean.
For commercial projects where appearance matters more (retail, upscale offices, hospitality), the same wood or PVC options used in residential projects work well. Consider higher-profile (6-8 inches) to achieve proper scale in commercial spaces with taller ceilings.
The Florida Building Code doesn't specifically regulate baseboard trim (it's considered finish work rather than structural), but commercial projects may have specific requirements around fire ratings for materials used in exit corridors or other critical areas.
Florida-Specific Considerations

Central Florida's humidity creates specific challenges for baseboard materials. Moisture causes wood to expand and contract, leading to gaps at joints, finish failure, and, in extreme cases, warping or cupping.
MDF baseboard requires complete sealing (including top and bottom edges before installation to prevent moisture absorption. Even pre-primed MDF should get an additional coat of primer on all edges. Once moisture penetrates MDF, the material swells and deteriorates irreversibly.
Solid wood performs better in humid climates if properly finished. The key is to seal all surfaces, including the back and edges, before installation. Paint or a solid stain provides better moisture protection than a clear finish.
PVC and composite materials solve moisture problems entirely. They don't absorb water, won't support mold growth, and maintain dimensional stability even in high humidity. For bathrooms, outdoor covered areas, or any area where moisture is a concern, synthetic materials make practical sense.
Florida's humidity affects installation techniques. Leave materials in the space where they'll be installed for 2-3 days before cutting and installing. This lets the material acclimate to local humidity levels, reducing expansion after installation.
Use flexible caulk (not spackling) to fill gaps between baseboards and walls or floors. Rigid fillers crack as materials expand and contract. Paintable latex caulk moves with the material while maintaining a clean appearance.
Consider installation timing. If possible, avoid installing baseboard during the most humid summer months when materials are at maximum expansion. Fall or spring installation means materials start at a mid-point in their expansion cycle, reducing the chance of gaps in dry winter months or buckling in humid summer months.
Your baseboard should coordinate with other trim in your home. Door frames and trim create visual rhythms that the baseboard should support. Using similar profiles, materials, and finishes throughout creates cohesion.
In Florida, matching your interior and exterior trim materials makes sense from both aesthetic and maintenance standpoints. While exterior trim faces tougher conditions, coordinating the style creates visual flow from inside to outside living spaces.
Frequently Asked Questions
For standard 8- to 9-foot ceilings, 3- to 5-inch baseboards work well. Taller ceilings (10+ feet) can accommodate 5-to 8-inch or taller baseboards. The general rule is that taller ceilings benefit from proportionally taller baseboards to maintain proper visual balance. Your door casing width also matters. Baseboards often look best when they're about 2/3 to 3/4 the width of your door trim.
For painted finishes in most Florida homes, poplar or quality MDF offers the best combination of cost, stability, and appearance. For stained finishes, oak provides beautiful grain and good durability. In high-moisture areas (bathrooms, laundry rooms), PVC baseboard eliminates moisture concerns entirely. The "best" choice depends on your budget, desired finish, and room conditions.
Baseboards and door trim should complement each other without necessarily being identical. They should use similar profile styles (both traditional or both modern) and materials, but heights can differ. Many designers make door casing slightly more detailed than baseboard, drawing attention to doorways while baseboards play a supporting role. Where they meet, the joint should look intentional rather than awkward.
Yes, baseboard installation is a manageable DIY project if you're comfortable with basic carpentry tools, especially a miter saw. The main challenges are cutting accurate corners and coping inside corners for tight joints. Start with a simple room to build skills before tackling more complex spaces. Professional installation typically produces cleaner results with better-looking corners, but DIY is certainly possible with patience and attention to detail.
Expect $2-$8 per linear foot total for baseboard replacement, including materials and professional installation. Basic pine with simple installation might run $2-$3 per linear foot, while premium hardwood with detailed profiles and custom finishing could reach $8-$10+ per linear foot. For an average 12x14 room (roughly 52 linear feet), total costs typically range from $200 to $600, depending on material and labor choices. Finishing (painting or staining) adds to these costs if not included.
Shoe molding (or quarter round) is a small trim piece that sits at the base of your baseboard, covering the gap between baseboard and floor. You need it if there are visible gaps due to uneven floors or if your flooring type requires an expansion gap. Many modern installations skip shoe molding for a cleaner look, letting the baseboard sit directly on the floor. If your floors are level and your baseboard fits tight to the floor, shoe molding is optional rather than necessary.
No, baseboards don't need to match your floor color, though matching is a valid design choice. Common approaches include matching baseboards to floor color (makes floors appear larger), matching to wall color (makes baseboards recede visually), or using a contrasting color like white (creates clear definition). The best choice depends on your overall design goals. In Florida homes, practical considerations matter too. Darker baseboards show dust more readily with light floors, while white baseboards stay cleaner-looking with most floor colors.
Use 15 or 16-gauge finish nails, typically 2 to 2.5 inches long for standard baseboard installation. The length should penetrate the baseboard and drywall, and extend at least 1 inch into the wall stud for secure attachment. For thicker baseboards (5/8 inch or more), you might use 2.5 to 3-inch nails. A pneumatic or cordless finish nailer makes the job much easier and produces cleaner results than hand-nailing.
Outside corners use 45-degree miter cuts on both pieces, meeting to form a 90-degree corner. Inside corners traditionally use a "coped joint," where one piece cuts at 90 degrees into the corner, and the second piece cuts along the profile to fit against the first. Coping produces tighter joints that hold up better as materials expand and contract. Many DIYers find coping challenging at first, but prefer it once they master the technique.
Working with Titan Florida Doors for Your Trim Needs
While baseboards might seem disconnected from doors, they’re actually closely related. Your baseboards need to coordinate with your door trim, and both should complement your door style and finish. At Titan Florida Doors, we supply door and frame systems throughout Central Florida, and we understand how all these elements work together.
Whether you’re working on a residential project or a commercial build-out, coordinating your door trim with your baseboard selections creates professional, cohesive results. We work with general contractors, commercial project managers, and homeowners who want their interior finishes to look intentional and well-executed.
Our team understands Florida’s climate challenges and how they affect trim materials. We can help you select door and trim combinations that will perform well in Central Florida’s humidity while achieving the aesthetic you’re after.
For residential projects: We’ll help you coordinate door styles, frames, and trim packages that complement your baseboard selections and overall design vision.
For commercial projects: We supply complete door and frame systems with commercial-grade hardware, and we can recommend trim solutions that meet durability requirements while maintaining proper aesthetics.
Ready to discuss your door and trim needs? Contact us for a consultation. We serve the Central Florida market with expertise in both residential and commercial applications.
